|
If you bought a time-limited subscription, ensure it has not expired.
Let’s dive deep into the truth behind the “Kutools licence name and code full” myth.
Once you have your official license name and code, follow these steps to activate the software: Open (or Word/Outlook depending on the version). Click on the Kutools tab in the top ribbon. Select Help > Register .
Free Trial Period: Extend Office offers a 30-day free trial with no feature limitations. This is the best way to test the software for a specific project.
This comprehensive guide covers how Kutools licensing works, the hidden dangers of using unauthorized registration codes, and how you can safely and legally access full features. What is Kutools and How Does the License Work? kutools licence name and code full
Download the latest version of Kutools for Excel from the official ExtendOffice website. Run the installer as an administrator to ensure all components are installed correctly. 2. Open Excel
An active internet connection is required for activation.
: Allows for more complex and powerful filtering options compared to Excel's standard filter.
Searching for "Kutools license name and code full" often leads to untrustworthy websites offering free registration keys, patches, or key generators. Relying on these sources carries severe consequences: If you bought a time-limited subscription, ensure it
The safest and most effective way to use Kutools for Excel is to purchase a legitimate license from the official website. This ensures you have access to all features, receive updates and technical support, and use the software without any security concerns.
Kutools periodically checks keys against an online registry database. Pirated keys are flagged instantly, leading to sudden software lockouts and lost project data.
: You can buy a lifetime license for products like Kutools for Excel or Kutools for Word starting from $49.00 USD .
Copy and paste the license code directly from your email to avoid mistakes. Click on the Kutools tab in the top ribbon
XXXX-XXXX-XXXX-XXXX-XXXX-XXXX
If you need to retrieve a lost license, simply contact ExtendOffice support with your order details—they will help you. And if you are still on the fence, take advantage of the to see for yourself whether Kutools is right for your workflow.
Search your email folders for keywords like "ExtendOffice" , "MyCommerce" , or "Kutools Order" .
: If you have already purchased Kutools but lost your information, use the ExtendOffice license retrieval tool with your registered email address.
You can find thousands of free, pre-written VBA macros on reputable coding communities like GitHub or Stack Overflow. Copying these scripts into your Excel Developer tab allows you to automate tasks safely and completely free of charge. To help find the best path forward, please share: Are you using Kutools for or corporate work ? Which specific Kutools feature do you use the most?
소스 | 설명 | 비고 |
CodeMirror | License: MIT | 일부 적용 |
| Eco Library | 아티클을참고하세요. | 배포 버전 사용 |
파일 업로드/다운로드 | 아티클을참고하세요. | 배포 버전 수정 적용 |
컬러 피커 | 아티클을참고하세요. | 배포 버전 수정 적용 |
|
속성명 | 하위 속성명 | 타입 | 설명 |
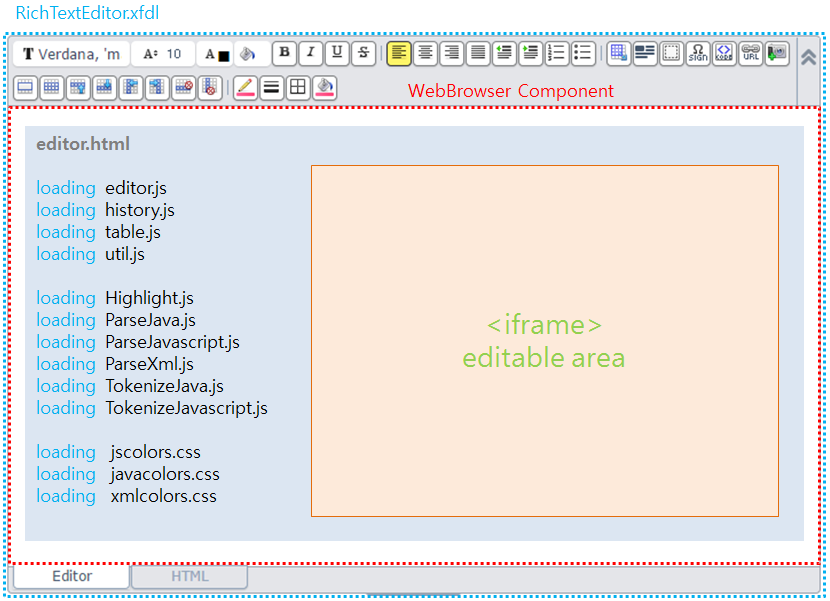
editor | url | string | editor.html 의 경로를 지정합니다. |
showToolbar | boolean | 툴바 영역을 보일지 여부를 지정합니다. | |
toolbarButtons | array | 툴바에 사용할 기능을 지정합니다. 지원하는 툴바 기능은 하단을 참고하세요. | |
allowResize | boolean | 에디터 영역의 리사이즈 허용 여부를 지정합니다. | |
showEditMode | boolean | HTML 편집모드을 보일지 여부를 지정합니다. | |
loadCallback | function | 에디터의 초기화가 완료된 후 호출되는 callback 함수를 지정합니다. | |
resizeCallback | function | 에디터의 사이즈가 변경될 때 호출되는 callback 함수를 지정합니다. | |
contentMinHeight | number | 에디터 본문 영역의 최소 높이를 지정합니다. 리사이즈 시 최소 크기보다 작아지지 않습니다. | |
contentMaxHeight | number | 에디터 본문 영역의 최대 높이를 지정합니다. 리사이즈 시 최대 크기보다 커지지 않습니다. | |
| contentHeight | number | 에디터 본문 영역의 초기 높이를 지정합니다. | |
| contentMinWidth | number | 에디터 본문 영역의 최소 너비를 지정합니다. | |
| contentHeight | number | 에디터 본문 영역의 초기 너비를 지정합니다. | |
| useInitFocus | boolean | 에디터 초기화 시 본문 영역의 포커스 여부를 지정합니다. | |
| table | width | number | 표의 기본 너비를 지정합니다. |
| tdheight | number | 행의 기본 높이를 지정합니다. | |
| headBorderStyle | string | 표 헤더에 적용할 기본 border style을 지정합니다. | |
| headBackgroundColor | string | 표 헤더에 적용할 기본 background style을 지정합니다. | |
| headColor | string | 표 헤더에 적용할 기본 color style을 지정합니다. | |
| bodyBorderStyle | string | 표 바디에 적용할 기본 border style을 지정합니다. | |
| bodyBackgroundColor | string | 표 바디에 적용할 기본 background style을 지정합니다. | |
| bodyColor | string | 표 바디에 적용할 기본 color style을 지정합니다. | |
| image | host | string | 이미지 파일을 등록할 host 경로를 지정합니다. |
| uploadUrl | string | 이미지 업로드 url 로 host 를 제외한 경로를 지정합니다. | |
| deleteUrl | string | 이미지 삭제 url 로 host 를 제외한 경로를 지정합니다. | |
| src | string | 본문에 추가될 url 로 host 를 제외한 경로를 지정합니다. | |
| allowTypes | array | 허용 가능한 확장자를 지정합니다. | |
| maxCount | number | 등록 가능한 최대 개수를 지정합니다. | |
| maxSize | string | 개별 이미지의 업로드 최대 크기를 지정합니다. | |
| maxTotalSize | string | 전체 이미지의 업로드 최대 크기를 지정합니다. |
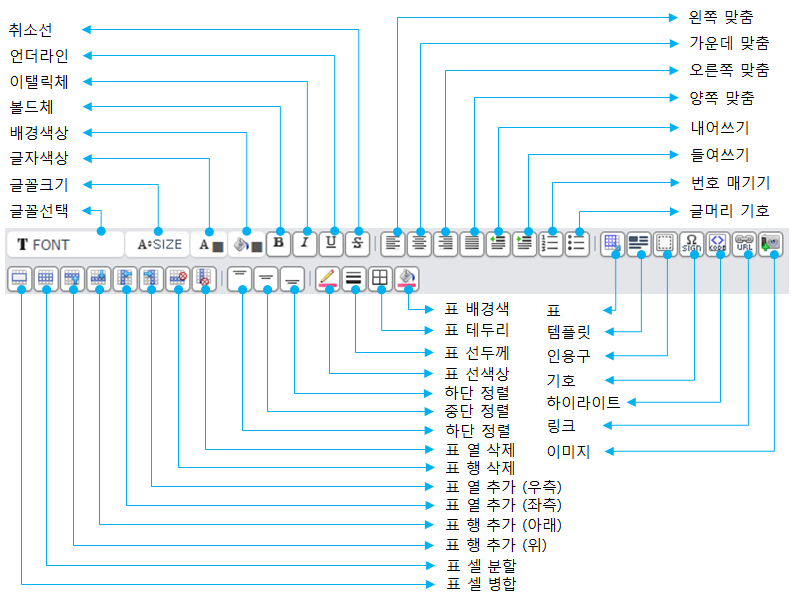
글꼴 | 맞춤 | 삽입 | 표 | ||||
ID | 기능 | ID | 기능 | ID | 기능 | ID | 기능 |
font | 글꼴선택 | left | 왼쪽 맞춤 | layoutTable | 표 | merge | 셀 병합 |
fontsize | 글꼴크기 | center | 가운데 맞춤 | template | 템플릿 | resetMerge | 셀 분할 |
color | 글자색상 | right | 오른쪽 맞춤 | blockquote | 인용구 | insertRowAbove | 위 행 추가 |
bkcolor | 배경색상 | full | 양쪽 맞춤 | specialchar | 기호 | insertRowBelow | 아래 행 추가 |
bold | 볼드체 | indentout | 내어쓰기 | highlight | 하이라이트 | insertColLeft | 좌측 열 추가 |
italic | 이탤릭체 | indentin | 들여쓰기 | link | 링크 | insertColRight | 우측 열 추가 |
underline | 언더라인 | numberlist | 번호 매기기 | linkdel | 링크취소 | deleteRow | 행 삭제 |
strikechar | 취소선 | marklist | 글머리 기호 | image | 이미지 | deleteCol | 열 삭제 |
| verticaltop | 상단 정렬 | ||||||
| verticalmiddle | 중단 정렬 | ||||||
| verticalbottom | 하단 정렬 | ||||||
| tablebdcolor | 선색상 | ||||||
| tablebdheight | 선두께 | ||||||
| tablebdrange | 테두리 | ||||||
| tablebgcolor | 배경색 | ||||||
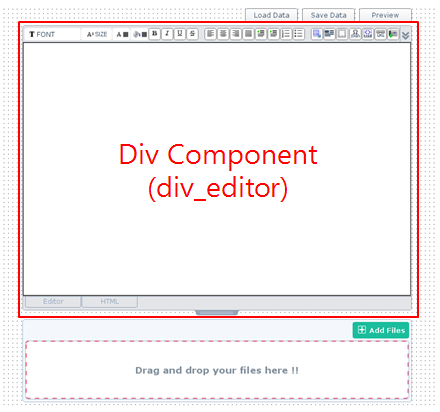
에디터의 setContent 함수를 통해 조회된 데이터(HTML)를 지정하고 setAttachImages 함수를 통해 본문에 등록된 이미지 목록을 표시할 수 있습니다.
3. 데이터 저장
btn_save 컴포넌트의 onclick 이벤트 핸들러에는 실제 데이터를 저장하는 코드는 없으며 첨부파일 저장/삭제 및 에디터 내용을 얻어오는 예시 코드가 작성되어져 있습니다.
에디터의 getContent 함수를 통해 현재 편집중인 내용(HTML)을 얻어올 수 있습니다.
※ 파일 첨부에 관련된 내용은 File 업로드 & 다운로드 샘플 아티클을 참고하세요.
4. 미리보기
btn_preview컴포넌트의 onclick 이벤트 핸들러에는 현재 편집중인 에디터 내용을 미리보는 팝업화면을 호출하는 예시 코드가 작성되어져 있습니다.
에디터의 getContent 함수를 통해 편집중인 에디터의 내용을 얻어온 후 showModal 함수를 통해 미리보기 샘플화면(RichTextEditorPreviewSample.xfdl)을 호출합니다.
미리보기 팝업화면에는 WebBrowser 컴포넌트가 하나 존재하며 Form 의 onload 이벤트 핸들러에서 설정된 preview.html 경로를 연결한 후 로딩이 완료되면 부모창에서 전달 받은 에디터 내용을 표시하게 됩니다.
실행환경 | 증상 |
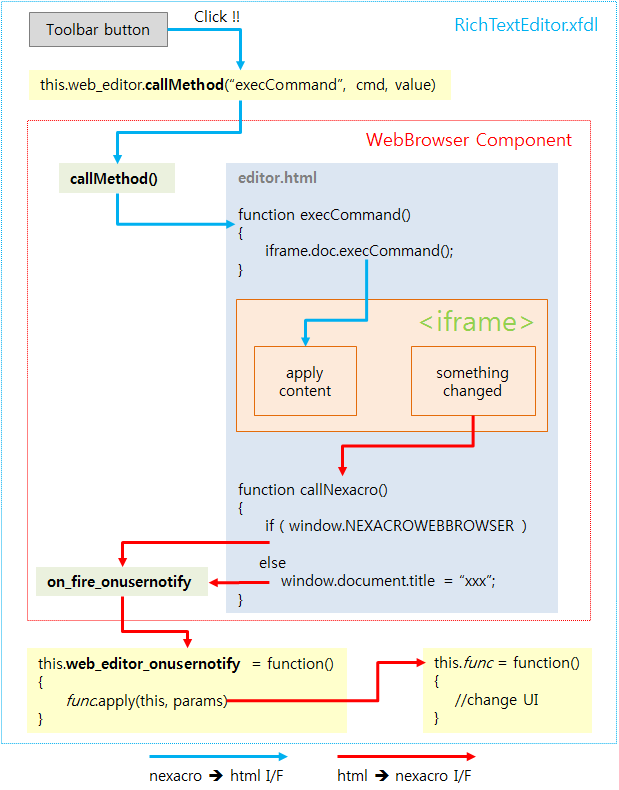
Runtime | WebBrowser 컴포넌트의 onusernotify 이벤트 핸들러에서 화면 페인팅에 관련된 변경이 발생하는 스크립트 실행 시 바로 반영되지 않고 WebBrowser 영역을 벗어나야 반영됩니다. 예를 들어 본문에 이미지를 첨부한 후 이미지를 선택하면 설정창이 팝업되는데 최초 팝업 이후 두번째 선택 시 팝업되지 않고 WebBrowser 영역을 벗어나야 팝업는 현상이 발생합니다. |
Runtime | WebBrowser 컴포넌트에 연결된 HTML 의 텍스트의 잘라내기(Ctrl+X) 와 복사(Ctrl+C) 가 동작하지 않습니다. |