140‐Day QuickBooks Trial Software
Installation Guide
This guide will help you install the 140‐day trial version of QuickBooks that is associated with your textbook. Depending on your textbook, the software may be available via digital download or DVD. This guide includes instructions for installing the software using both methods. Also included are instructions for toggling to the Pro edition of the software, which is necessary for some users. Be sure to check out the Common Questions section at the end of this guide.
Contents |
|
| Note! Your QuickBooks trial software is intended for use on a Windows‐based PC. The | |
software cannot be installed mobile devices using the iOS or Android operating system. |
|
Please see this page for more information on system requirements to install QuickBooks. |
Installing QuickBooks – Digital Download
If your trial version of QuickBooks is provided via digital download, you will access the software from the Intuit website.
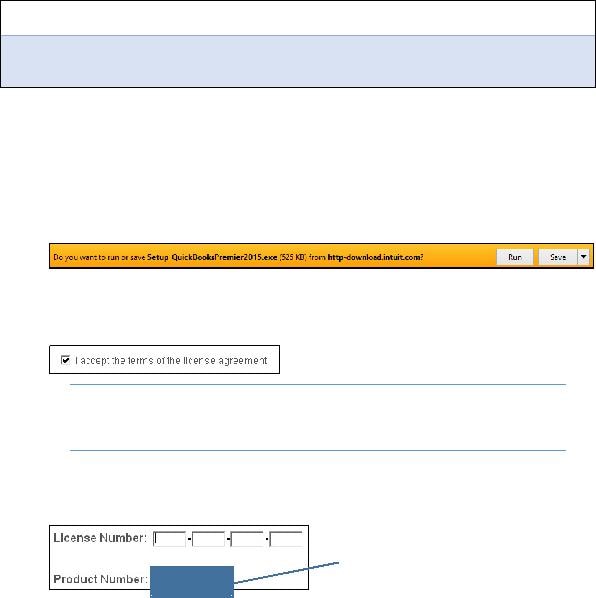
Before you get started, make sure you have your license number and product number handy.
15‐digit license number: ___ ___ ___ ___ – ___ ___ ___ ___ – ___ ___ ___ ___ – ___ ___ ___
6‐digit product number: (QuickBooks 2014) 602 – 834 (QuickBooks 2015) 503 – 154
1.Close all running programs, including antivirus programs.
Remember to restart your antivirus program(s) after the software installation is complete.
2.Open a web browser and navigate to http://quickbooks.com/download.
These instructions use Internet Explorer. Different web browsers may behave differently.
3.Click the QuickBooks Accountant link for your version of QuickBooks.
4.Choose the Run option in the download bar, and then choose Yes in the dialog box that appears.
Continue with the next step after the download completes.
5.Click Next in the wizard screen, and then click Next in the Intuit QuickBooks Installer window.
6.Click the checkbox to accept the terms of the license agreement; click Next.
Tip! If desired, use the Print link at the top‐right corner
of the window to print the License Agreement for your records.
7.Ensure that the Express (recommended) installation type is selected; click Next.
The Express installation will place QuickBooks in the default location on your computer.
8.Type your license number and product number in the provided boxes; click Next.
For QuickBooks 2014, use 602‐834.
For QuickBooks 2015, use 503‐153.
9.Click Install.
The installation can take time, so be patient!
10.Click Open QuickBooks in the screen that appears after the installation is complete.
11.If a notice regarding how QuickBooks uses your Internet connection appears, click OK.
The QuickBooks trial software is now installed on your computer.
12.Toggle to the Pro edition of the software, if necessary for your course.
T
Installing QuickBooks – DVD
If your trial version of QuickBooks is provided via DVD, simply follow these steps.
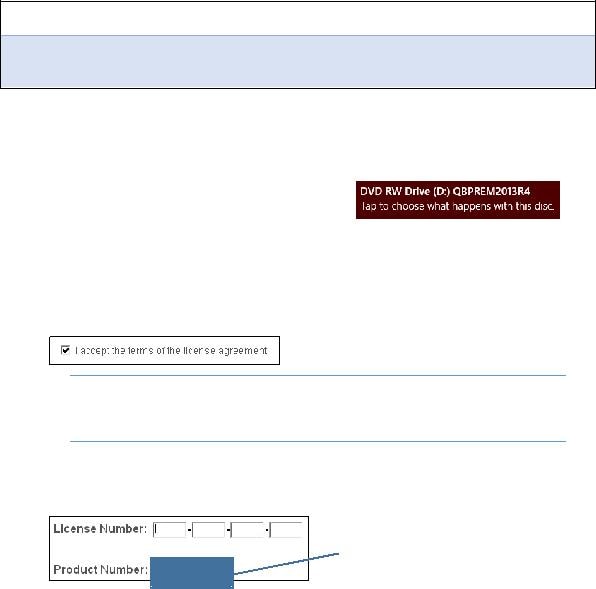
Before you get started, make sure you have your license number and product number handy.
15‐digit license number: ___ ___ ___ ___ – ___ ___ ___ ___ – ___ ___ ___ ___ – ___ ___ ___
6‐digit product number: (QuickBooks 2014) 602 – 834 (QuickBooks 2015) 503 – 154
1.Properly install the installation disc into your computer.
2.Follow the step for your version of Windows:
Windows 7: Click Run setup.exe.
Windows 8.1: Tap the banner that appears at the top‐right corner of the screen and then click Run setup.exe.
3.Click Yes in the User Account Control window.
QuickBooks begins the installation, and the Intuit QuickBooks Installer window will soon display.
4.Click Next in the first screen that appears.
5.Click the checkbox to accept the terms of the license agreement; click Next.
Tip! If desired, use the Print link at the top‐right corner
of the window to print the License Agreement for your records.
6.Ensure that the Express (recommended) installation type is selected; click Next.
The Express installation will place QuickBooks in the default location on your computer.
7.Type your license number and product number in the provided boxes; click Next.
For QuickBooks 2014, use 602‐834.
For QuickBooks 2015, use 503‐153.
8.Click Install.
The installation can take time, so be patient!
9.Click Open QuickBooks in the screen that appears after the installation is complete.
10.If a notice regarding how QuickBooks uses your Internet connection appears, click OK.
The QuickBooks trial software is now installed on your computer.
11.Toggle to the Pro edition of the software, if necessary for your course.
oggle to the Pro Edition
Your trial software of QuickBooks is the Premier Accountant edition. If you are enrolled in a full QuickBooks course using a QuickBooks Pro textbook from Labyrinth Learning, you must align your software version with the textbook.
Note! If you are enrolled in a payroll course using Labyrinth’s Payroll Accounting textbook, you are not required to toggle to the Pro edition.
Before you begin, complete the first Develop Your Skills exercise in your QuickBooks Pro textbook.
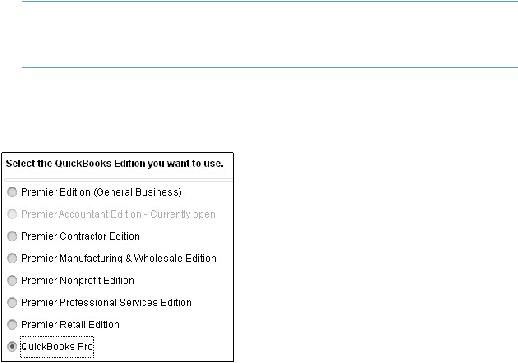
1.In QuickBooks, choose File > Toggle to Another Edition.
2.Click in the circle to the left of QuickBooks Pro and then click Next.
3.Click Toggle, and then click OK in the Close Accountant Center window.
QuickBooks will close and then reopen in the Pro edition. The title bar will show that you are using the Pro edition “via” the Accountant edition.
Custtermux-4.8.5-android-5-universal-compatible... ((full))
CustTermux (specifically version a specialized, unofficial fork of the application designed to run on Android TV and legacy devices running Android 5 (Lollipop) What is CustTermux?
: Since it runs on Android 5, it lacks modern security patches. Avoid using it for sensitive data.
bridges this gap. It is a recompilation of the modern source code designed to be "universal."
Beyond compatibility, CustTermux is packed with enhancements tailored for media consumption and server management. Key features include:
Have you tested CustTermux-4.8.5 on an unusual device? Share your experience in the community forums under the tag #CustTermuxLegacy. CustTermux-4.8.5-android-5-universal-compatible...
: Features specialized settings for Auto-Start IPTV and EPG (Electronic Program Guide) Generation .
apt update && apt upgrade -y
🔧
This specific release allows vintage Android 5.0 (Lollipop) hardware—such as aging Smart TVs, older Amazon Fire TV sticks, and legacy mobile chipsets—to serve as high-utility local network servers and IPTV streaming nodes. Key Technical Specifications Feature / Attribute Specification Details universal (Supports arm64-v8a, armeabi-v7a, x86, x86_64) Minimum OS Version Android 5.0 (Lollipop / API Level 21) Target Use Case TV Streaming, Network Automations, JioTV Go Integration Interface Modifications bridges this gap
: The "universal" tag indicates the APK contains libraries for multiple CPU architectures (armeabi-v7a, arm64-v8a, x86, x86_64), making it compatible with almost any Android TV box or firestick. Enhanced TV Functionality
The package features multi-architecture support, bundling binaries optimized for armeabi-v7a , arm64-v8a , and x86 processors.
: If you attempt to log in too many times quickly, the server may enter a cooldown period. Restart the app or clear the app data if the issue persists.
: Unlike a standard mobile command prompt, CustTermux integrates customized native layout elements, an initial setup page, and fully mapped remote control hotkeys. This design choice bypasses the need for an external physical keyboard on a television screen. Share your experience in the community forums under
Once installed, run these commands to ensure your environment is ready:
Includes a custom UI and on-screen keys (Ctrl, Alt, Arrows) designed to be navigated using a standard Autostart Functionality:
Based on the release notes and repository, version 4.8.5 included the following key updates:
is a specialized, open-source Android build designed to bring automated IPTV and media server functionality to legacy hardware and smart TVs. Maintained primarily as a custom fork of the popular Termux application on GitHub, this precise version targets devices running Android 5 (Lollipop) and Android 6 (Marshmallow). It bridges the gap between old hardware, command-line utility, and automated modern live-streaming via integrated terminal environments. Overview of CustTermux
If pkg update fails, you may need to run termux-change-repo and select a working mirror, or manually edit /data/data/com.termux/files/usr/etc/apt/sources.list . Getting Started: Basic Commands Once installed, you can start using it immediately: Install Git: pkg install git Install Python: pkg install python Check Storage: termux-setup-storage Navigate Storage: cd /sdcard Limitations While CustTermux-4.8.5 is excellent, it has limitations:
If apt update fails, the hardcoded mirror might be temporarily offline. You can change your package source to a community legacy mirror by editing your sources list: nano $PREFIX/etc/apt/sources.list Use code with caution.